The modern education system places increasingly high demands on the quality of education. The number of students who do not have time to master the primary and secondary school curriculum has increased several times in recent years. One of the reasons for this negative trend is the insufficient development of the optical and speech systems in children, as a result of which specific difficulties arise when teaching primary schoolchildren to write, called dysgraphia.
Optical dysgraphia – what is it?
Most often, difficulties with written speech arise at the beginning of schooling. If a child is found to have specific persistent writing impairments, it is very important to determine the type of deviation. Only with the correct identification of the type of dysgraphia is further effective work on its correction possible. Taking into account the characteristics of the pathology and the characteristic mistakes that a schoolchild makes when transferring sounds to paper, five types of dysgraphia are distinguished. Today we will talk about one of the most common of them.
Optical dysgraphia is a special category of deviations in written speech, which is associated with insufficient development of the child’s optical and spatial concepts, as well as with an incompletely formed system of visual analysis and synthesis. In other words, the child at this stage is simply not yet ready to transfer words to paper, turning sounds into letters, and cannot correctly form and write down in the form of symbols what he hears.
What mistakes does a child with optical dysgraphia make?
Children with optical writing disorders most often have difficulty transferring letters onto paper in the correct form. They distort the appearance of letter characters or write them in mirror images. Schoolchildren cannot write letters correctly, so they unintentionally add extra loops or details to them, or lose the necessary components of the characters.
Experts say that most often optical-type dysgraphics make the following specific errors:
- Substitution of letters consisting of identical elements in different quantities (hooks, circles, etc.). Most often in writing these are the letters sh-i, r-y, m-l, t-p. for example: neck - eeya, rag - pyapka, coin - loneta.
- Replacing letters with similar spellings that have different locations of individual symbol elements. In written form, these are letters such as b-u, v-d, sh-t. for example: booth - fishing rod, cleaning - buorka, schoolboy - tkolnik, fork - dilka.
- Loss and failure to complete the components of letters. Most often, hooks are lost in the capital characters y and d, ticks in the letters b, a, etc. for example: Anton - Λton.
- Writing letters in their mirror image. The characters are written correctly, but in the wrong direction. Very often this type of mistake is made by left-handed people. For example: Ekaterina - Zkaterina.
It is extremely important to remember that the student does not make such mistakes intentionally, and the reason here does not lie in his laziness, reluctance or irresponsibility. Most often, the child takes learning extremely seriously, however, neither his efforts nor the extra time devoted to writing bring the desired result.
Correction of optical dysgraphia
The success of eliminating disorders in this type of dysgraphia directly depends on the prevention of deviations and the timely start of classes. At the same time, a competent combination of classes with a professional speech therapist-defectologist and home techniques aimed at developing the child’s speech and written functions will help to achieve maximum efficiency.
Corrective work must be individual, consistent and systematic. Exercises to correct optical dysgraphia are aimed at:
- the formation of a child’s visual perception of shapes, sizes, colors of objects;
- development of visual memory;
- work on auditory and visual analysis and synthesis;
- mastering the skills of graphic symbolization;
- differentiation of symbols (letters) that have a similar graphic expression.
- development of fine motor skills.
Only a competent speech therapist-defectologist can develop an individual plan for the correction of optical dysgraphia for a child, taking into account the peculiarities of the onset of the pathology, age and other characteristics of the child’s psyche.
System of work for the prevention of optical dysgraphia in preschool children with OHP
Kromskaya A.I. System of work for the prevention of optical dysgraphia in preschool children with OHP // Sovushka. 2021. No. 3(5). URL: https://kssovushka.ru/zhurnal/5/ (access date: 11/18/2021).
APPENDIX: Presentation for the article “System of work for the prevention of optical dysgraphia in preschool children with ODD”
The relevance of this topic is due to scientifically confirmed information that every year the number of children with various types of dysgraphia in school increases. The level of primary school education in Russia suffers the most: back in 2007, Russia ranked 15th in terms of literacy levels among schoolchildren, but by 2010, in a ranking of 65 positions, we had slipped to 43rd place (research by the International Program for assessment of students' educational achievements (PISA - Program for International Student Assessment).All this indicates the severity of the problem of dysgraphia in modern society.
Dysgraphia is a partial specific disorder of the writing process, caused by the immaturity (impairment) of higher mental functions and manifested in repeated errors of a persistent nature. One type of dysgraphia is optical dysgraphia.
Optical dysgraphia is caused by the immaturity of visual-spatial functions: visual gnosis, visual mnesis, visual analysis and synthesis, spatial representations.
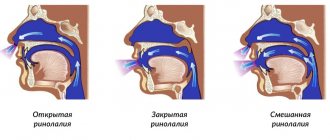
With optical dysgraphia, the following types of writing disorders are observed:
a) distorted reproduction of letters in writing (incorrect reproduction of the spatial relationship of letter elements, mirror spelling of letters, underwriting of elements, extra elements);
b) replacing and mixing graphically similar letters.
This type of specific writing impairment is not associated with the state of the child’s oral speech. In these cases, a child who has quite sufficient visual acuity does not seem to see the difference in the outline of optically similar letters, which leads to their replacement in the letter or to the incorrect spelling of some letters.
Impaired written language negatively affects:
- on children’s school performance;
- increase the time required to master the school curriculum;
- cause children to have a negative attitude towards the learning process.
And if we take into account all this that reading and writing are the necessary basis for all subsequent education, then the severity of the problem becomes obvious.
As mentioned above, dysgraphic disorders are caused by the immaturity of higher mental functions involved in the writing process. Their underdevelopment can be detected already in older preschool age.
In the studies of L.G. Paramonova[3] notes that 45.8% of preschoolers have prerequisites for optical dysgraphia. This:
Difficulty concentrating and switching visual attention,
· disturbances in the perception of objects,
Difficulties in the integrity and selectivity of visual perception,
visual memory impairments
· insufficient development of the ability to navigate in space,
· Impaired hand-eye coordination.
Thus, it is obvious that work to eliminate dysgraphia should begin not at school, when specific errors in writing are discovered, but in preschool age, long before the child begins to learn to read and write.
Considering that preschoolers with ODD have a qualitative uniqueness and a lower level of formation of those non-speech mental functions, which are prerequisites for the occurrence of optical dysgraphia, compared to their peers with correct speech, the main goal of my work is to develop a system of measures to prevent optical disorders in the group for children with OHP.
Main goals:
- Formation of visual gnosis (perception).
- Developing concentration and the ability to switch visual attention.
- Expanding the volume and clarifying the visual mnemonic system (the ability to remember the visual image of a letter).
- Development of visual analysis and synthesis (the ability to determine the similarities and differences of letters).
- Formation of spatial representations.
- Development of hand-eye coordination.
- Automation of visual representations of graphic images of letters;
- Differentiation of letters that have optical similarities.
Various didactic games and exercises are means of preventing optical dysgraphia in preschoolers with ODD.
The preparatory stage is working with pictures (from the senior speech therapy group).
The main stage is working with letters (from the preparatory speech therapy group).
At the preparatory stage, children develop skills that contribute to optically literate writing and reading.
The formation of visual perception, attention, and memory is carried out on the basis of the principle of gradual complication of the material, according to which it is advisable to begin work at this stage with exercises aimed at visual perception of real objects, their dummies or color images. When examining them, children identify significant characteristic features. Games are used to classify objects - from a variety of pictures, those given on a specific topic are selected (“Cookware”, “Toys”, etc.). In the game "4 extra" children find an extra picture. In the game "Cut Pictures" it is proposed to fold an object from 4-6 parts, and in the end from 8-12. Children love to look at an incomplete image of an object (the game “What did the artist forget to draw?”). In the game “What did the artist mix up?” Not only visual perception develops, but also thinking. Didactic games and exercises are used: “Find the same figure”, “Show a large, medium and small ball...”, “Multi-colored steps”; “Think of what is round (square...), thick, narrow...?”, “Collect a piece of paper.” If working with color images did not cause any difficulties, you can move on to contour images (game “Color the Mushroom”). Gradually, schematic images, graphic signs and symbols begin to be used. Last but not least, materials with superimposed images and noise are used. Tasks are used to correlate a color image of an object with a contour or silhouette (“Whose Shadow”). At this stage, tasks to compare objects are constantly given. All game exercises are related to the main topic of the lesson.
Particular attention at this stage is paid to the development of visual memory. The main activity in this direction is working with a sample. First, the child completes the task with constant visual reference to the sample, then the time of looking at the sample is reduced, but so that the child has time to look at and remember the sample (various versions of the games “What’s gone?”, “What’s changed?”, etc.).
Work to clarify ideas about the diagram of one’s own body is the basis of spatial orientation. Initially, reference points are developed in the diagram of one’s own body: top, right, bottom, left. Work on developing orientation in your own body begins when studying the topic “Parts of the Body.” Next, preschoolers learn to determine directions in space relative to their body. The next stage is the development of orientation in preschoolers in the location of objects relative to each other. In parallel with this work, the understanding and use of the proposed constructions denoting spatial relationships is being clarified. When children begin to accurately navigate the spatial position of objects, they move on to tasks with pictures, geometric shapes, numbers, and letters (for example, the game “Electronic Mouse”).
The work on developing, automating and differentiating the directions of space in the diagram of one’s own body is combined with the development of movement coordination and the improvement of fine motor skills of the hands (these include various physical exercises and sets of finger exercises). Physical exercises and gymnastics for the fingers, for the eyes, in combination with fixing the directions of space, also pursue another goal - relieving the mental and psychophysical stress of students, contributing to a better assimilation of the material studied in class.
Working on developing hand-eye coordination is important at this stage. Tasks are used for copying a figure, completing the missing part based on a sample, tracing the contour of the drawing by points, shading, accurate reproduction of the sequence of a graphic series, and various labyrinths. Exercises of this type are actively included in homework, as well as in individual and frontal classes.
At the main stage, children learn to recognize letters and distinguish letters that have similar shapes from each other.
Tasks, games and exercises aimed at preventing optical difficulties when writing are included in the preparatory group in planned frontal classes on the formation of lexical and grammatical components, coherent speech, literacy training, as well as in individual work on pronunciation.
At the main stage, I work with letter material in a certain sequence, taking into account the gradual complication of the material: first at the level of letters, then syllables, then words, and finally sentences.
In the process of speech therapy work on the formation of letter gnosis and differentiation of optically similar letters, the following tasks are proposed:
- “What does a letter look like?” - correlating a letter with some object of similar shape (for example, O is a wheel, K is a signalman...) with memorizing poems about the letter;
- game “Count the letters” - find the same letter, but written in a different font;
- name the letters crossed out with additional lines;
- game “Smart Eyes” - recognize letters combined with each other;
- recognize letters superimposed on each other;
- identify correctly and incorrectly written letters;
- finding letters hidden in geometric shapes;
- recognize letters by their mirror image;
- show and name the correct letter among the letters correctly and mirror imaged;
- find in the text and underline (cross out) the given letter;
- trace the outline of the letter, fill it with small letters, shade it;
- game “Fold the letter” - complete or fill in the missing elements of the letter;
- reconstruction of letters (transformation from one to another);
- game “Smart Pens” - identifying letters by touch;
- writing letters in the air with a finger or pencil;
- find out what letter was written with your finger on your palm, on your back;
- recognition of embossed letters (from sandpaper, cardboard);
- designing printed letters from various elements: sticks, string, plasticine, seeds, matches...
Particular attention is paid to familiarizing children with the trajectory of hand movement when writing a letter. It is explained to children that the elements of a letter are always written from top to bottom.
Thus, solving the main tasks of remedial education, work is purposefully carried out to form functional prerequisites for mastering optically literate writing in preschoolers with general speech underdevelopment.
Literature.
- Kalinichenko S.A. Prevention of optical dysgraphia in preschool children with general speech underdevelopment - g. “Preschool pedagogy”, No. 2, 2006.
- Milostivenko L. G. Methodological recommendations for preventing reading and writing errors in children. - St. Petersburg, Stroylespechat, 1995.
- Paramonova L.G. Prevention and elimination of dysgraphia in children. - St. Petersburg, Union, 2001.
- Prevention of optical dysgraphia and dyslexia in preschool children: From the experience of T.B. Popova, teacher-speech therapist at the Children's Preschool Educational Institution "Kindergarten No. 45" in Birobidzhan. – Birobidzhan, OblIUU, 2009.
- Sadovnikova I.N. Impairments of written speech and their overcoming in primary schoolchildren. - M., Vlados, 1997.
- Povalyaeva M.A. Speech therapist's reference book - Rostov-on-Don, Phoenix, 2004.
Examples of exercises to correct optical dysgraphia
Practice shows that the best results come from playful forms of work. To begin with, you can ask your child to complete these simple tasks:
- An exercise to differentiate between simple symbols and images that are superimposed on each other. These can be letters, outlines of animals or household objects familiar to the student. You should find all the letters in the picture and write them down separately.
In the next picture, you need to find and paint over with a colored pencil those letters that are in the words “smoke” and “cat”.
Exercises allow the baby to develop visual memory and focus on correct perception and differentiation of object shapes. - A task to develop the perception of the size of objects. The child is asked to look at the picture and form a word, taking into account that the first letter is the largest, the second is smaller, and the last is the smallest. For example, in the first puzzle the student must find the word “cat”, in the second – “feast”, etc.
The same task should be performed with the opposite condition: the letters in the word increase rather than decrease. That is, having solved the first puzzle, the child will determine the word “mouth”, the second - “gender”, etc. - Graphic dictations. One of the most useful exercises for developing correct orientation in the surrounding space and hand-eye coordination. The dictation is selected depending on the age of the child and his preparedness.
- An exercise for developing fine motor skills and preparing the hand for writing basic symbols and signs. The child needs to place a pencil at the beginning of the figure and, without lifting the pen from the paper, completely trace each element using the hatching.
- An exercise for recognizing letters in their mirror image. The student is asked to find the correctly written letters in the image and color them in.
- A task for recognizing letters with a similar graphic expression. The child is asked to solve the code. If the letter “i” is denoted by the number 2, because it has 2 hooks, and the letter “w” is denoted by the number 3, because it has 3 hooks, then how to correctly write the encrypted words: - boy2k; — l2l2ya; - l2stock; — 3tans; - horse; - 323ka.
All exercises are carried out in a playful way, so they do not cause discomfort or negative emotions in the child. The tasks are aimed at solving a key problem, because when completing them, the student constantly thinks about the features of writing letters, and also independently finds differences and similarities in them. Ultimately, this is what ensures the acquisition of writing skills.
Publication date: 04/10/2019. Last modified: 01/13/2020.
Optical dysgraphia - symptoms, causes, prevention and treatment
A game complex for the correction of optical dysgraphia in primary schoolchildren (described in the article by candidate of pedagogical sciences, associate professor E. V. Zhulina “EXPERIENCE IN PREVENTION AND CORRECTION OF OPTICAL DYGRAPHIA AND DYSLEXIA THROUGH INNOVATIVE TECHNOLOGIES”):
I. Exercises to develop visual perception and recognition
1. Perception and recognition of geometric shapes
Exercise “Guess what shape”
Students are asked to guess which figure will be depicted on the screen using parts of this figure that appear one after another:
1) Square
- vertical bar:
Students offer answer options (the thought process is underway to remember geometric shapes and their properties): square, rectangle (they understand that a circle cannot be here, since it does not have straight lines).
- horizontal line:
Students assume it is a square because both lines are equal in size.
- image of a square.
Afterwards, the teacher invites the students to determine which things in the class resemble a “square”, that is, they have a square shape, after listing or if the students find it difficult to determine
figure in objects and things - the slide “Geometry around us” is shown. The same exercise is carried out with other geometric shapes: triangle, rectangle, circle, rhombus, oval.
After that, exercises No. 1 and No. 2 are performed in the Workbook.
Exercise “Noisy Figures”
Students are asked to look at the shapes superimposed on each other.
In the first version, the figures are colorless with an outline.
After the child identifies the figures, they “scatter” to the sides and are signed. The teacher repeats the names of the figures with the child:
In the second version, the figures are multi-colored on a colored background.
After identification, the figures also scatter to the sides; the child must write down their names in the Workbook himself.
In the third version, the figures are multi-colored on a white background, and the number of figures is much larger, some are repeated. The child counts how many triangles, squares, rectangles and circles he has examined.
After this exercise with the interactive whiteboard, a similar exercise No. 3 in the Workbook is performed to consolidate the recognition of shapes.
2. Perception and recognition of letters
Exercise “What letter does this look like…”
The child is asked to look at several pictures with objects and items. His task is to determine which letter these images resemble.
Exercise “What a letter looks like”
The exercise is based on the Macromedia Flesh animation program. Students must identify what the letter being shown looks like, for example:
Letter A. Students' proposals: roof of a house, mountain, etc.
Letter Ш. Students' proposals: fence, fork, etc.
After comparing a letter with an object, each of the proposed letters on the screen takes on the shape
a specific subject, for example:
The letter "A" turns into a rocket;
The letter "B" turns into a sail;
The letter "O" turns into the sun...
Next in the workbook, exercise No. 4 is performed: “What does a letter look like?”
To consolidate the recognition and perception of letters, a group task is carried out. Students are divided into 2 groups. Each group chooses a pair of vowel letters “A” - “O” or “U” - “I”. The guys draw on a piece of whatman paper
a little history of these letters. Here you need to show imagination and imagination and sketch as many similarities of objects and letters as possible, as well as take into account the differences of a given pair of letters.
Exercise “Noisy” images of letters
(presentation “Noisy Letters”)
Using an interactive board, the teacher offers to look at a series of images with letters. These letters are superimposed on each other, merging with each other. The student’s task is to identify the letter and name it.
Exercise “Spoiled” letters
(presentation “Spoiled Letters”)
The student is asked to look at several images of unfinished (“spoiled”) letters. The main task is to determine what letter it is, that is, to recognize it and name it (write it down). For example:
Exercise “Right and Wrong”
(presentation “Correct and incorrect letters”)
Students look at pairs of letters. Their task is to choose those that are written correctly and explain the incorrect spelling of others. For example:
After working with the interactive whiteboard, exercises No. 9, 10, 11 are performed in the Workbook.
3. Visual perception
Exercise "Find the differences"
(presentation “Find the differences”)
Students are presented with a series of paired pictures, they must find the differences, the teacher marks these differences on the screen, then the words are pronounced in chorus.
Exercise “Remember and make a picture”
(presentation “Memorize and repeat the image”)
The teacher demonstrates on the interactive board:
— Schematic images, the student’s task is to put together the same image from sticks (matches) according to the sample, and then from memory. The exercise becomes more difficult each time. First, the teacher demonstrates the image three times, then twice and once. First, simplified images are used, then more complex ones, with more elements:
Then the children are asked to make their name out of sticks or matches.
— Drawings that need to be remembered and drawn from memory. The teacher pays attention to the main elements of the drawing, the correct arrangement of the elements of the drawing.
Exercise “One or the other”
(presentation “One or the other”)
Students assemble letters using sticks or matches, in different versions:
- make another letter from one letter (add or remove an element)
- add 1 or 2 elements to make a letter, etc.
The teacher demonstrates an example, then suggests laying out certain letters and making other letters from them. It is concluded that there are letters with similar elements. In conclusion, the teacher suggests using the elements shown to collect the letters in which they occur.
Exercise “Remember the pictures”
(presentation “Remember the pictures”)
The teacher shows a series of pictures one by one.
Task: Remember 3-5 pictures, and then find them among others (6-10).
II. Spatial orientation includes a number of exercises (series of presentations “Spatial Orientation”):
• Exercise “Right-Left”
• Exercise “Higher-lower”
• Exercise “Outside-Inside”
Students are shown pictures with images of animals and objects, the students’ task is to determine right and left, before and after, above - below, outside - inside, etc. After teamwork with
Reinforcing exercises No. 12-13 in the Workbook are performed using the interactive whiteboard.
• The last gaming technique for the development of spatial concepts and memory is a game
"Remember the Motion" based on Macromedia Flesh.
The teacher demonstrates a moving object, the student must remember the trajectory of movement and reproduce (name) using space words - left, right, down, up. The game gradually becomes more complicated when another object is added and you need to remember the trajectory of movement of two objects, and also describe what is moving above, what is below, what is further, etc.
III. Visual modeling method
Creating a diagram (model) significantly activates the learning process. Schemes and models of various structures (sound, syllable, word, sentence) gradually accustom children to observations of language.
This series of exercises involves working with both an interactive whiteboard and a workbook.
1. Working with letters
At the initial stage of visual modeling, we work with letters. The teacher introduces to the children
assign each letter of the Russian alphabet to one box. If the word contains 5 letters, therefore, we draw 5 windows.
1. Working with the “Window Letters” Presentation
Tools: interactive whiteboard, presentation.
Model: one letter = one window, vowels - green windows, consonants - no color.
The cartoon character Dunno, who needs help, is invited to the children's lesson.
Task 1 – fill in the empty boxes with words that are presented in the form of pictures. The guys name the word and count the number of letters, correlating words with a certain number of letters to the required boxes.
Task 2 – repeat vowel sounds and highlight them in words. We paint the windows containing vowel letters green. We define models for each word.
Task 3 – you need to distribute the words into the boxes. The guys note that each word consists of 5 letters, then Dunno comes to the rescue and paints some of the windows green.
The guys guess that the green boxes correspond to vowels and, thus, identify each word according to the required boxes.
Task 4 – diagrams are given, the students’ task is to come up with words according to these diagrams. The words are written in a notebook (exercise No. 20), one of the students works with the interactive board according to this task.
After completing the exercises according to the presentation, students in addition work independently in the workbook with exercises No. 21 and 22.
2. Working with the Presentation “Letters-symbols”
Task 1 - Students work with symbols.
The main task is to determine which vowel letters are disguised in the displayed symbols.
To begin with, all the vowels are remembered and pronounced, written down in a notebook in handwritten and printed versions. Next, the children identify similar elements of the letters and presented symbols and relate each symbol to the desired letter.
Task 2 - Next, the teacher demonstrates models of words containing symbols instead of vowels, the children work with the interactive board, as well as in the Workbook and fill out these models with words.
Task 3 – identify the words encrypted by Znaika based on the models.
Task 4 – independent work on drawing up models based on the sample.
Task 5 – creating symbols for consonant letters.
The teacher prepares cards with consonant letters in advance. Each student chooses one of the cards at random. The student's task is to disguise the consonant letter into a symbol, and the symbol must contain any element (or elements) similar to the original letter. The teacher hangs all the compiled symbols on the board. Students “unscramble” the symbols until they can name the original letter.
Such game tasks contribute to a more solid consolidation of knowledge about letters and their elements, as well as their visual perception.
IV. Techniques for differentiating optically similar handwritten letters (p-r, m-sh, g-p, p-t, s-e, s-e, v-d, etc.)
1. Exercise “make a word”.
You can work in pairs or groups.
A) The guys take out letters from the chest, from which they must form a word.
B) A series of letters are presented on the interactive board. The children's task is to put them together into the correct word. Students can work either in their notebooks or take turns with the interactive whiteboard. The correct word is usually a keyword related to the topic or game lesson.
2. Classes with cereals.
By working with cereals, children develop and improve fine motor skills of their hands, as well as develop visual perception and memory.
The teacher prepares a plate of cereal for everyone (rice, buckwheat, etc.) and after showing several slides, invites the children to work in their plates and draw letters in them, first presented on the board, then under dictation.
3. Game “Distribute the pictures”
Based on the studied pairs of optically similar letters, the teacher selects the corresponding pictures. The interactive board presents a pair of letters (for example, p-t) and scattered pictures. Children match pictures that begin or contain the letter p or t to the corresponding letter.
4. Exercise “Insert letter”
The board shows words in which letters are missing according to the topic (for example, p-t). Students sign the letters, then repeat the exercise in the workbook.
5. Exercise “Elements of letters”
The teacher draws an element of a handwritten letter on the board, the children must guess what kind of letter it might be. A similar exercise is then completed in the workbook.