Logokub - an unconventional speech therapy aid for speech development
Didactic manual for speech development Ecological Logocube.
Goal: Organizing individual work with preschoolers to familiarize themselves with the world around them and develop speech.
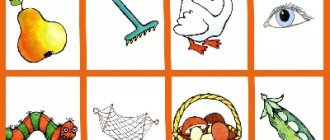
Games: 1. “Which tree is the leaf from?” Goal: to teach children to form relative adjectives from nouns. Birch leaf - birch, Rowan leaf - rowan, Poplar leaf - poplar, Rowan leaf - rowan, Oak leaf - oak, Aspen leaf - aspen.
2. “Whose tail?” Goal: to teach children to form possessive adjectives from nouns. The fox's tail is a fox's tail, the hare's tail is a hare's tail, the squirrel's tail is a squirrel's tail, the wolf's tail is a wolf's tail, the tiger's tail is a tiger's tail, the lion's tail is a lion's tail.
3. “Choose a home” Purpose: To introduce children to the names of the homes of animals, insects, birds. Enrich your vocabulary with nouns (hollow, den, hole, beehive, swamp, anthill, etc.) Eagle lives on the rocks, Starling - in a birdhouse, Swallow - in a nest, Bee - in hives, Squirrel - in a hollow, Caterpillar - on a leaf, Spider - in a web, Frog - in a swamp, Mouse - in a hole, Ant - in an anthill, Bear - in a den, Fox - in a hole.
4. “Feed the birds in winter” Purpose: To give children knowledge about the nutrition of wintering birds.
5. “Whose traces?” Goal: to teach children to form possessive adjectives from nouns, to introduce them to animal tracks.
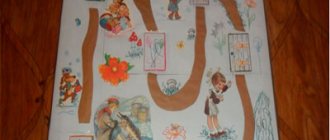
Inside the cube “Winter Forest Layout”
Squirrel tracks are squirrel tracks, Hedgehog tracks are hedgehog tracks, Bear tracks are bear tracks, Hare tracks are hare tracks, Wolf tracks are wolf tracks.
6. “Rules of behavior in the forest” Purpose: To familiarize children with the rules of behavior in the forest, to develop coherent speech.
The envelope contains illustrations and speech material for conducting conversations with preschoolers about nature.
Photo from personal archive. I used information from the site nsportal.ru/ Author's manual.
Comments
12+ Media registration certificate: El No. FS 77-59233 dated September 4, 2014, issued by the Federal Service for Supervision of Communications, Information Technologies and Mass Communications (Roskomnadzor).
Speech development manual "LOGOCUBE"
author: Antropova Anastasia Andreevna
teacher - speech therapist MBDOU "Combined Kindergarten No. 137 "Alice"
Speech development manual "LOGOCUBE"
Didactic manual for speech development “Logocube”
Author: Antropova Anastasia Andreevna teacher - speech therapist MBDOU "Kindergarten of a combined type No. 137 Alisa."
Explanatory note
Preschool age is a very important period in the formation and development of a child. The main activity of preschool children is play. During the game, all mental processes develop, the main place among which is speech.
We would like to present to your attention the didactic manual “Logocube”, which is intended for the development of a child’s speech, as well as for the development of attention, logic, fine motor skills and phonemic processes.
This manual is suitable for all age groups and can be used in numerous variations, each face of the cube represents either a separate task (game), or it is possible to combine the faces into one plot (for example: a descriptive story). The manual can be used in individual lessons and in subgroups. Children really enjoy completing tasks using the Logocube; they are happy to attach pictures, pronounce words, and create chains of words on their own, thus, positive emotions during the lesson contribute to high-quality learning of the material.
DIY educational cubes: description of the process
All children need toys. There is not a single adult among adults who does not remember which toy was the most favorite in his childhood. The cubes that you make with your own hands can become such an unforgettable thing for your child. Soft, bright, comfortable to play - they will become both a favorite pastime and an excellent decoration for a child’s interior.
What are developmental cubes for?
Adults understand that a toy should help a child develop, spurring his imagination, teaching him patience and attentiveness. At the same time, it must be age-appropriate, otherwise it will be difficult for the baby to understand it, and an older child may quickly get bored with it.
The educational cubes that we will learn to sew are suitable for children from six months to 5 years. They will help your baby not only develop coordination of movements, but also teach him to identify colors, recognize animals, and distinguish letters or numbers. It all depends on exactly how and what you make them from.
Positive qualities of cubes
Some parents buy their kids a bunch of toys, some buy a small number, but everyone agrees on one thing: toys that are made with their own hands will remain a wonderful memory for many years.
In order for your child to have a rich inner world, you must have toys in the house. With their help, your baby will be able to explore the space around him, show his imagination and feelings.
Toys create an atmosphere of warmth and comfort in a children's room. They help the child not only understand the world, but also develop his communication abilities.
After all, a game is a trainer for the ability to communicate, negotiate and find compromise solutions.
Children love to experience new sensations and learn the unknown, so you and your child can always create educational cubes with your own hands. Select the color of the craft and decorations for its sides, cut out some details - what could be more interesting for the baby!
Every fidget will appreciate your efforts if you complete a craft together. To make him happy, you just need to allow the baby to dream up and choose what he wants. Many needlewomen can make educational cubes for children with their own hands, even without a special pattern. After all, even novice craftsmen can cut out squares of suitable size from fabric and then sew them.
Such toys are made depending on what kind of fantasy you have and what your child likes. In order to make a developmental cube for a baby with your own hands without a pattern, you need to have:
- filler;
- scissors;
- handle;
- textile;
- threads;
- a needle.
As we have already said, making educational cubes with your own hands is not difficult. To do this, you need to adhere to the following action plan:
- Cut out 4 equal squares from the fabric.
- Sew them together with the wrong side up.
- Leave a small hole.
- Turn the product right side out.
- Push the filler into the unstitched hole with a handle until your cube becomes elastic (while trying to prevent it from becoming a ball).
- Sew up the hole.
That's all! You have made a development cube with your own hands. The master class is the simplest and most straightforward - even a child can use it.
In addition to simple crafts, you can use a more complex manufacturing scheme. We offer a pattern for it in the article. The sides of such a cube cannot be made multi-colored, but the craft will have few seams, which will make it more durable.
Another cube option
For a more complex cube you will need:
- sheet A4;
- pencil;
- scissors;
- eye pins;
- chalk;
- textile;
- sewing machine;
- threads;
- filler;
- pen;
- ruler.
If you have a brightly colored fabric with an interesting print that will last a long time, try using it. In any case, when a child sees how easy it is to cooperate with parents, the process will give both him and you a positive charge for the whole day.
Making a cube
Keep in mind when making educational cubes with your own hands that they can have different sizes. That is, they can be large, like poufs, or small, comfortably fitting into your baby’s palm.
- Using a pencil and ruler, draw the patterns on paper, making the dimensions of the sides as you wish.
- Cut it out.
- Using pins, pin the pattern to the fabric. When outlining future developmental cubes with your own hands or with the help of your child with chalk, do not forget to leave seam allowances.
- Using the outline of the pattern, cut out the silhouette from the fabric.
- Smooth out future edges of the cube.
- Place the pieces of fabric right sides together.
- Using a sewing machine, sew the pieces together, leaving a small gap to turn the craft right side out.
- Turn the future cube inside out.
- Using a pen, fill the shape with filler.
- Sew the hole using a machine.
You will have to do this process several times. Until you get the required number of cubes.
Now you have learned how to sew a developing cube with your own hands.
Sometimes, with a small amount of imagination and desire, you can create crafts of unprecedented beauty and importance. Each item you make for your own child is individual. Educational cubes for children, made with your own hands, a necessary thing.
Felt cube
We will share with you another way to make a developing cube with your own hands. You won't need any patterns here:
- felt of different colors;
- scissors;
- dummies of cubes;
- pencil;
- fabric glue.
You will make a developmental cube from felt with your own hands according to the instructions presented below. It is pleasant to the touch and durable. This material holds its shape well, is durable and will serve your baby as a toy for a long time.
Instructions for completing the craft
Let's get started:
- Measure the side of the cube.
- Transfer measurements to felt.
- Use scissors to cut out squares for future sides of the cube.
- Using glue, attach the felt squares to the base of the craft.
Use fabric of different colors to make your own development cube. You can come up with ideas for making it yourself. And to teach your child to navigate colors, use their palette more widely. This will be a useful activity and an exciting game for a child.
The need for cubes in the house
At a young age, children cannot have friends who would be constantly with them. But toys can become a good companion for a baby, especially when he loves them and distinguishes them from others.
With the help of educational cubes, every child is able to build a tower and learn to distinguish colors and images on them. Cubes can be the initial stage of learning the alphabet. And if you show imagination in making crafts, you will delight your child with the originality of the toy.
For example, sew on it ribbons of different colors, buttons of different sizes, images, badges, large beads, funny appliqués - all this can be combined in one cube. The child will definitely appreciate such beauty and quickly find what interests him in this toy.
To make a developmental cube for a child 6 months and older, you need to have:
- cube pattern;
- fabric - several scraps of different colors;
- accessories - buttons, fasteners, rings, etc.;
- igloo;
- pins with eyes;
- chalk;
- a thread;
- scissors;
- filler.
It is advisable to have a sewing machine, but this is not a prerequisite for work. You can simply get the job done quickly with its help.
How to sew a cube for a baby
Now start creating:
- Attach the pattern to the fabric. Pin it with pins. Draw chalk along the outline of the pattern.
- Remove the paper pattern and cut out the resulting silhouette with scissors.
- Fold the fabric with the right side inside the product.
- Sew the sides of the cube together, leaving one free.
- Turn the product right side out.
- Complement with accessories. Using a thread and a needle, sew on buttons, fasteners, zippers, laces, and shreds.
- Fill with filler.
- Sew up the remaining side.
Your cube is ready. It is ideal for developing fine motor skills of a child's hands and fingers. The baby will be happy to explore the toy and perhaps even bite it.
If among the accessories with which you decorate the cube there are all kinds of simulators for scratching gums during teething, this will be a great help for the child.
When you have older children in the house, you can ask them to help make the blocks. And jointly creating a toy for a younger family member will certainly bring the older child closer to the little one he took care of.
Toys you need
Undoubtedly, toys should be appropriate for the child’s age; they should help the baby develop. Every child should have a set of toys that actually develop the necessary qualities.
If your baby doesn’t play with the blocks at first or doesn’t pay attention to them, don’t be upset. Just get him interested, it's easier than it might seem. To begin, place the toy in the most visible place.
If your baby doesn't care, try playing with it yourself. Such a temptation is beyond the power of even the most persistent child. In any case, he will want to touch the development cube with his own hands.
Ideas for the game come to the child during the process of its implementation, so you don’t have to worry about his imagination.
Educational cubes for different ages
If your child is barely six months old, then a soft developmental cube, made with your own hands, from materials that are pleasant to the touch, will be perfect for him.
Because during this period of life, the child explores the world by touch and by tooth.
And if your baby is teething, then various large accessories in the form of wooden and plastic rings attached to this toy will be very useful.
At one year of age, the baby is able to move developmental blocks from place to place. You can already teach him to distinguish colors using these toys. Everything is simple here - you make cubes of different colors and play with your child.
After one and a half years, your child can already build pyramids from cubes, if you have previously used them in the game. Two or three constructions of towers are enough for the child to be interested in this action. He will be happy to try a new activity for himself. And when he succeeds in building, it is likely that he will begin to destroy the pyramids with even greater passion.
Two-year-old children can already imagine what animals look like. Therefore, having made educational cubes for them with your own hands with images of animals, birds and fish, you can ask your child to show where who is depicted. It may be difficult for him at first, but you must convey the necessary information to your child before making this request.
One of the useful functions of cubes is the transformation of information that is, at first glance, complex for a child into the desired form. For example, cubes with letters are perfect for learning the alphabet. As a rule, there are letters on two sides of such a cube, and on the remaining sides there are images that correspond to these symbols.
Let the toys you make become your baby's favorite!
Master class on making a developmental cube
» Sewing Author admint Reading time 12 min. 08/11/2015 Face one - HEDGEHOG For work you will need: 1. a piece of cotton measuring 20*20cm, glued on the inside with interlining, 2.
a piece of padding polyester 20*20 cm, ironed with steam until flat, 3. Velcro 16cm long, cut into squares 2*2cm, or immediately into circles with a diameter of 2cm (approximately), a total of 8 pieces with a fleecy base and 4 pieces with a prickly base, 4.
waxed cord (or narrow ribbon) 60cm long (cut into 4 pieces of 15cm each), 5. one black button for the nose, one small black button/sequin/bead for the eye, a button for decoration (in my case the mushroom is optional),6. felt parts - muzzle (cut out along the dotted line (see.
Non-traditional speech therapy manual "Logocube"
Irina Nubaryan This speech therapy manual can be used by speech therapists and teachers in individual lessons and in children’s independent games. The manual consists of a cube with 6 sides of different colors and planar images of objects, animals, plants, etc.
d. The images are removable and are attached to the cube using Velcro.
The child’s task is to attach pictures to the faces of the cube in accordance with the assignment. The manual can be used for classes with children 4 – 7 years old.
The main advantages of the manual: • cubes are easy to use; • one child or several children can participate in the game and complete tasks at the same time; • cubes can be rearranged and moved; • they are voluminous, but convenient for storage; • planar images of objects (pictures) can be stored directly inside the cube; • cubes give the speech therapist and educator the opportunity to use a variety of didactic games in their work aimed at developing children's vocabulary, grammatical structure of speech, phonemic analysis, phonemic representations, developing cognitive processes, spatial orientation, as well as automating sounds.
Educational cube for children - types, manufacturing instructions
How to make a development cube with your own hands – interesting ideas, a master class with step-by-step descriptions. Types of useful toys, author’s techniques.
[ads-for-wp ads-id=»9184"][a[ads-for-wp ads-id=»9157"]ds[ads-for-wp ads-id=»9158"]fight the house in which If you have a small child, sooner or later it becomes like a toy store.
Rattles, balls, dolls, cars, all kinds of construction sets - relatives buy all this in large quantities for their beloved little one.
Among the motley variety of ultra-modern and complex mechanisms, you will definitely find the good old cubes, which have changed little over the long history of their existence.
Clear and simple, these educational toys are still popular among parents and are interesting for both babies from 1 year old and older children. It's amazing how a simple cube with colored edges changes its purpose depending on the age of the child.
For the most
Department of Education of the Rasskazovo City Administration
CompetitionLogocube Exhibition participant Antonova Nadezhda Nikolaevna Educator: Antonova Nadezhda Nikolaevna MBDOU "Kindergarten No. 5 "Fairy Tale" PHOTOS OF WORKS Antonova Nadezhda Nikolaevna Brief summary of the non-traditional methodological manual "Logocube" Brief summary of the methodological manual. Today, the problem of speech is very relevant in preschool age. The number of children with speech disorders increases every year.
These children are often characterized by low cognitive activity; their memory, thinking, and attention suffer. Therefore, the most important condition for improving the speech activity of preschool children is the creation of a favorable situation that promotes the desire to actively participate in verbal communication. In this case, the gameplay is of particular importance.
Play is the main activity of children. To increase the interest of children in the classroom, you have to select and modify gaming techniques and methods in your work.
"Logocube". Non-traditional speech therapy guide for speech development
Ekaterina Igorevna
"Logocube". Non-traditional speech therapy guide for speech development
Currently, there is an increase in the number of children with speech . According to diagnostics carried out annually in the fall and spring in our preschool educational institution, more than 70% of children need help correcting speech . speech therapist , I see my task as finding effective ways and means of correcting the development of a child’s speech . And in order for one of the main components of the lesson - articulatory gymnastics - to be varied, emotionally pleasant and dynamic, I use the “ Logocube ” development of the organs of the articulatory apparatus
-
non-traditional speech therapy manual on speech development by authors - N.
V. Kiseleva, N. Yu. Nikiforova. The speech cube can be used from early preschool age. This manual is a cube with six sides, on each of which there are cards with articulation exercises for a specific group of sounds; it can also have transparent pockets into which cards are inserted for solving a wide variety of problems: developing phonemic hearing and perception, improving lexical and grammatical skills building speech , automation and differentiation of sounds at any stage of work.
Game “Gymnastics for the tongue”
Goal: development of articulatory motor skills.
Description. The pictures that are inserted into the pockets show signal drawings for articulation exercises: painter, horse, mushroom, cup, horse, etc. Small rhymes are selected for each exercise. The speech therapist reads a poem, the child finds this exercise and performs it.
Game "Find the picture"
Goal: differentiation of sounds in words.
Description: the speech therapist lays out pictures whose names contain sounds that are close articulatory and acoustically (for each sound the same number of pictures are selected)
face up.
Then he instructs a child or a subgroup of children to find pictures with only one sound and attach one picture to each face of the speech cube. When all the pockets of the logocube are filled , the children check the pictures so that there is no conflicting sound.
This game can be played to differentiate hard-soft, voiced-dull sounds. Game "Soundtrack"
Goal: automation of isolated sound.
Description.The edges show pictures with sound tracks for a specific sound: an airplane with a remaining trace, a pump with a hose, a kettle with steam, a snake on a path, etc. The child finds an image for a given sound and pronounces the sound in one exhalation, running his finger along the sound track .
Games with pure sayings.
Goal: automation of sound in syllables and words, development of phonemic hearing, grammatical structure, and vocabulary.
Description. On the faces of the Speech Cube there are pictures with pure tongues.
Option 1 The child, turning the cube, pronounces pure phrases. You can speak pure phrases with different intonation, timbre, quietly - loudly, slowly - quickly.
Option 2. Finish the sentence cleanly. The speech therapist pronounces the beginning of the phrase, and the child looks for a picture with a suitable ending and completes the sentence.
This is only a small part of the game tasks that can be given to a child using the Logocube manual .
.
Depending on the goals and objectives set during the lesson, you can change the game tasks. Children enjoy learning with this manual .
Specifics of the work of a speech center in a general preschool institution. Specifics of the work of a speech center in a general preschool institution. A speech therapy center can be compared to a “model” of integrated learning.
Our children One of the priority areas in preschool institutions is work on speech correction and development. There are children who need it.
How to make a cube out of paper: detailed creation instructions
Reading time: 5 minutes Don't have time?
The link to the article has been successfully sent!
We will send the material to you by e-mail
When you need a base in the form of a cube for a craft, you need to know how to make a cube out of paper. The HomeMyHome editors will be happy to tell you in what ways you can do this, and you will choose the option that you like best.
Soon you will have cool homemade paper cubes PHOTO: bestdiy.ru
Secrets of making a simple volumetric cube
When you suddenly need a cube in your house, there is nothing easier than making it out of paper. There are several assembly methods.
How to make a cube out of paper: development diagram
A development is a simple diagram that will allow you to assemble a three-dimensional product from a material. The cube development can be printed, glued or made yourself.
Manufacturing instructions
Let's decide what kind of cube we want to assemble from paper or cardboard, or maybe you want to make a cube with photographs with your own hands?
How to make a paper cube
How to make a paper cube according to the diagram? It is easy and simple to download and print. Then you can follow the simple instructions and get the desired result.
To create a scan, prepare your own paper, a simple pencil, a ruler and scissors. Since each side of the cube is square, we need to draw squares with perfectly even right angles.
You can print a paper cube template PHOTO: fs-center.ru
Any cube has 6 faces, so there should be exactly six of them in the diagram. First, we draw a central square of the desired width (remember that the possibilities of A4 are not limitless), and around it we draw 4 more squares with the same side length. We draw the last square on any element
In addition to the edges, allowances for gluing are required. We draw them from the side, drawing them to the three sidewalls. Each allowance should not be more than 1 cm. Do not forget that the corners of the allowances are cut at 45º.
It turns out to be a cube PHOTO: pinterest.com
You can take scissors and cut everything along the lines. We bend the edges of the future cube. All allowances are also carefully bent and coated with glue. Now all that remains is to glue all the parts and let the product dry.
How to make a cube out of cardboard
Let's figure out how to make a cube out of cardboard with your own hands.
The only difference in making a cube from paper and cardboard is that we first make a development from paper if the cardboard is very thick. This will help avoid mistakes and sloppiness. No one forbids applying markings directly to the reverse side of the cardboard.
Here's how to make a cube out of cardboard PHOTO: shkolala.ru
DIY photo cube: creative photo album
How to make a cube with photographs with your own hands? This is a creative puzzle that allows you to assemble different photos.
The diagram of a do-it-yourself cardboard cube is absolutely identical to the diagram of its paper counterpart and can be reproduced even by a child PHOTO: syl.ru
To make a funny photo album on a transforming cube, you need to glue a piece of a photograph or picture to each of its faces.
In the work they use glue, ready-made cubes assembled from cardboard (4 cm edges), and tape.
For the transformation to be successful, you need to glue the cubes together correctly PHOTO: livemaster.ru
It is better to print the photos so that they match in size. The image must be taken with dimensions of 8×8 cm². You can immediately make a line 1 pixel wide: it will be easy to cut after printing, and the line itself will be invisible.
If we take 8 cubes, then we need to prepare 10 photographs. The picture is cut into 4 parts along the selected line, and each element is glued to the edge. But before that, you first need to stick strips of double-sided tape in a certain way.
Photos should be pasted as carefully as possible PHOTO: babyblog.ru
How to make an original and bright modular paper cube with your own hands
Creativity knows no boundaries, and paper is a source of inspiration for different people. Let's see how to make a cube from sheets of A4 paper.
Origami cube made from square paper
It is unlikely that anyone is not familiar with the word origami: the ancient technique continues to enjoy constant popularity among people of different ages.
It is very interesting to try to make a cube from origami paper.
For creative work you need a square from a sheet of A4 paper. The square must be folded twice diagonally, marking the fold lines. You need to make a triangle by tucking the edges inward. We bend the free corners to the top. Such actions must be done on all sides of the triangular figure.
Origami assembly diagram PHOTO: samodelki.org
You need to bend the opposite corners from the sides into the center, focusing on the vertical. We perform similar actions with the other side.
Where the conical protrusion remains, you need to bend the free corners twice, then putting them in the pockets.
All that remains is to find an open corner and blow air into the figure, obtaining a three-dimensional square. Now you know how to make it out of paper.
How to make a square from a rectangle
To make a square from a rectangular sheet, you need to grab any free corner and pull it to the opposite side of the sheet: the point is that the extreme sides completely coincide with each other. The lower part will remain free; you just need to cut it off.
How to make an origami paper cube
Here is a diagram of how to make a paper cube.
PHOTO: slovami.net
How to make a Rubik's cube from paper
Perhaps it is better to make such a bright cube together with children!
These are the stages of work to be performed:
IllustrationDescription of action
| Take a square and fold it in half |
| Unfold the sheet and fold one side towards the middle. Ironing the fold |
| Unfold the fold and fold the other side |
| Bend the first corner. We do the same with the opposite |
| You need to bend the edge of the “door” with a bent corner |
| We grab part of the “door” and bend the product at a slight angle |
| Now to the resulting figure we bend the second side with a bent corner, also in the form of a “door” |
| You need to bend the opposite corner, getting a parallelogram |
| The corner of the parallelogram needs to be hidden in a pocket |
| We bend the element with the corners facing each other outwards |
| Hiding the corner of one element in the pocket of another |
| We put all the elements into each other's pockets, forming a cube reminiscent of a Rubik's product |
| The result is beautiful and impressive |
How to make a dice out of paper
To assemble the dice, you need to print out a cube template for gluing.
We use thick cardboard onto which we transfer the template PHOTO: russiachess.ru
Yoshimoto Cube
A very interesting puzzle craft that you can reproduce at home with your own hands.
Sweep circuit
A cube that can be rotated and turned into different shapes is always popular. To make a craft, you need to take cardboard, a pencil, a ruler, scissors and PVA glue.
We print the template so that there are 16 elements PHOTO: multidea.ru
Yoshimoto scheme PHOTO: toysew.ru
Manufacturing instructions: video
The workpiece must be folded along the lines and glued with tape. This is done with each of the 16 parts. All elements must be connected to each other, and how to do this is in the video presented:
Now you know how to make a three-dimensional square out of paper. Good luck with your work!
Loading…